
Amazon Kindle Publishing: Step by Step Guide on How to Upload Books on Amazon

After writing a book, the next phase is the publishing phase. Amazon is one of the famous sites where authors can easily self-publish their books without paying publishers to publish them. Steps on how to upload books on Amazon are straightforward. It is not a difficult thing. However, uploading a book might be challenging for new authors unfamiliar with the website.
Uploading books on Amazon is very easy if you understand the concept. It is not something that you need to hire someone to do for you. It is something that you can do within minutes.
I will walk you through how to upload books on Amazon in this article. With this tutorial, you can upload your book by yourself on Amazon, and the book will be live within 72 hours. However, if you have not written your book, you can learn how to write a book in 7 simple steps, or you can also learn how to set up an Amazon KDP account.
HOW TO UPLOAD BOOKS ON AMAZON

Uploading a book on Amazon is divided into three phases. I’m going to discuss the three stages of how to upload books on Amazon in detail.
But before then, I believe that you’ve created your KDP Account, and it is now left for you to upload your book on Amazon.
The first thing that you need to do is to head to Amazon and sign in. Once you have signed in, go to the left and click “+add ebook” It will now take you to the form page, where you will fill in your ebook details and upload your book. I will explain the steps on how to upload books on Amazon in detail shortly.
This article is based on how to upload the ebook and paperback versions. So, I’ll explain the things you’ll see on both pages. If you don’t see some on your ebook page, know it is meant for the paperback page.
KINDLE EBOOK DETAILS / PAPERBACK DETAILS

It is the first page you will see when you want to upload your book. It is a significant page because it is where you’ll fill in your book details. This page also serves as the book ranking page because it is where you’ll add everything that will boost your book ranking. I call it the powerhouse page because it houses the book title, description, and categories.
So, be careful when filling out this page. Any error from this page might affect your book sales.
Let’s see the things that make up this page;
LANGUAGE: It is the first thing that you’ll see on this page. You will be required to choose your ebook language. By default, it is set as English. Depending on your location, you can select any language. But remember that the language you choose is your ebook language. Ensure the language is displayed correctly before going to the next page.
BOOK TITLE: It is where you add your book title. I believe that you’ve chosen your book title before uploading your book. When writing your title, make sure that the capitalization is correct. You can use CAPSLOCK for the title, or you can use Capitalizemytitle to format your title. Whichever method you use, make sure your title is well-written.
SUBTITLE: This is the space where you add your book subtitle. It is optional. So, if your book has a subtitle, you can add it to that space. Remember that there is a limit to the number of characters. So, make sure your subtitle does not exceed the number of characters. I prefer using long-tail keywords in my subtitle to boost my book ranking.
SERIES: This is very important if you are writing a book that is on series/episodes. When you finish the first series, give it a name and number so buyers can track other series using the name and number. If your book is on series, add the series name and number. It will help you greatly, especially in reaching out to your readers.
EDITION NUMBER: This is for books that are divided into editions. It is mostly textbooks. If you are writing books you plan to edit/revise in the future; you might need to give it an edition number. You can name your book “first edition,” and when you revise it and add other things in the future, you can call it “second edition.”
Not only that, but you can also write different books and name them different editions. It all depends on what you’re writing.

AUTHOR NAME: It is your PEN NAME. What does it mean? Penname is the name you want Amazon to display on your book profile. It is different from the registration name. However, you can use the same name for both.
Example: The name I used in my KDP registration is Harry Peter, but my Author’s name/pen name is Harry Kane. Amazon KDP will use Harry Peter to pay me because it is what is on my author/publisher’s information page and payment page. It is what is in my bank account/check. But Harry Kane is what is displayed on my book cover and on my Auto-central page, and it is what buyers see in my books. It is also what is shown on my book page. So, I hope you understand the difference between them.
Read also, Self-Publishing a Book: 18 Powerful Steps to Becoming a Best Seller Author
CONTRIBUTORS: These are the names of those that contributed to your book. If you’ve contributors, you can add their names, but you can leave them blank if you don’t have any. You can add more than one contributor.
DESCRIPTION: This is the space where you’ll add your book description. After writing your book description, proofread it well and ensure that the spacing is okay. Then copy it and paste it here.
PUBLISHING RIGHT: Be careful when choosing an option here. If you wrote the book, select the first option, “I own the copyright, and I hold the necessary publishing right.” But if you’re publishing a public domain book, choose the second option.
Remember that Amazon is strict when it comes to copyright. So, ensure that you wrote the book that you choose publishing right.

KEYWORDS: It is the space where you add your keywords. Amazon permits users to add up to 7 keywords. It can be a single-word keyword or a long-tail keyword. I believe you have gotten your keywords before uploading your book. So, add them here.
Don’t forget to add your keyword. It is essential for book ranking.
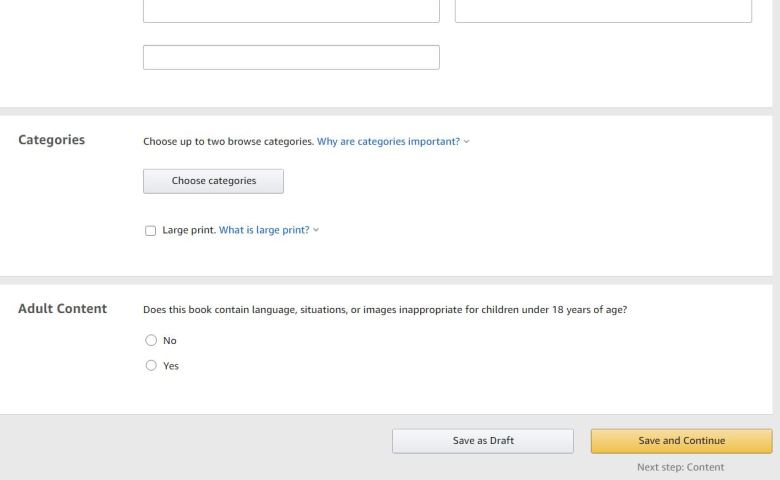
CATEGORIES: Add your book categories here. Amazon permits authors to select only two categories for their books. When you click on a category, it will display various categories with a (+) sign on the left. Click on the + symbol to view sub-categories and choose the best one for your book.
LARGE PRINTS: You’ll see this on the paperback page. Large print editions usually have a font size of 16 points and higher. If you check this box, “large print” will appear on your book’s Amazon detail page. Checking the box won’t change your book’s font size. I usually leave it since I don’t want my books to have large print.
AGE AND GRADE RANGE: It is where you add your audience’s age grade. It is typically used when writing kids’ books. You can select the age grade that can read your book.
PRE–ORDER: Pre-order lets customers pre-order your book as much as one year before the release date. Customers who pre-ordered your book will automatically have it delivered to their Kindle on your book’s release date.
ADULT CONTENTS: You will see this on the Paperback page. It is the option that allows you to choose whether your book has adult content or not. Since my books are non-fiction without adult content, I always select “NO.” But if yours has adult content, you can choose yes.
NOTE: Most of the things on this page are optional. So, you can skip the ones that are not necessary.
When uploading your ebook and paperback, ensure that the details are correct before publishing. After you have finished publishing your ebook and your book is live, if there are errors or you think you need to change the title, you can do that. You only need to go back to the publishing page and edit the title.
However, it is not like that in PAPERBACK. Once you have published the paperback, you cannot edit the language, title, subtitle, edition, or Author. It is because the book has already been assigned an ISBN number. So, do your research very well before publishing a paperback. If you think the title is not good enough, you can publish only the ebook and watch it for some time before publishing the paperback. However, if you want to edit the paperback, you must unpublish the first paperback and publish it again as a new book. I hope you understand now.
The above things are what you will see on the first page of the publishing page.
After you have inputted the details, click “Save” at the bottom, and you will be taken to the next page.
KINDLE EBOOK CONTENT/ PAPERBACK CONTENT
It is the second section of your publishing page. It is another vital page because it is the page where you will upload your book. Pay attention to all the details on this page because everything on this page is significant. How you configure this page is how your book will look when buyers read it through their kindle devices or when printed. I’ll explain everything you see on this page, one after the other. Let’s get started;
MANUSCRIPT
Under the manuscript, you will see the following;
DIGITAL RIGHTS MANAGEMENT (DRM): It is the first thing you will see on this page if you are publishing an ebook. DRM (Digital Rights Management) is intended to inhibit the unauthorized distribution of your book’s Kindle file. Some authors want to encourage readers to share their work and choose not to have DRM applied to their books. If you select DRM, customers will still be able to lend the book to another user for a short period and can also purchase the book as a gift for another user from the Kindle store.
NOTE: Once you publish your book, you cannot change its DRM setting. I always tick “NO” since I don’t like it. But you can choose any option that you want.
Read also, Ten Different Types of Writers— Where Do You Fall Into?
PRINT ISBN: It is for a paperback. You will be required to add your book ISBN or use Amazon ISBN. ISBN stands for International standard book number. It is mostly seen at the back of each book. It gives you a copyright over the book.
If you have already bought ISBN, you can click “Use my ISBN,” but if you don’t have it, you can click “Assign me a free KDP ISBN.” If you click that, KDP will assign you a free ISBN for your book, which you can only use on Amazon. If you unpublish the book and want to publish it again, you will need a new ISBN. The ISBN is only for that particular book and includes; the title, subtitle, edition, and Author. Once you are assigned an ISBN, you cannot edit the title again. It is one of the reasons why you cannot edit the title and subtitle of the paperback after you have published your book.
KINDLE EBOOK ISBN: You can add it if you have it or leave it blank. I always leave it blank since it is an ebook, which is not compulsory.
PUBLISHER: If you are using a publishing company or you are a publishing company. You can add your company name here. I always leave it blank since I am self-publishing.
PUBLICATION DATE: It is the date the book was first published. If you add this option, you cannot edit it again. And if you leave it blank, Amazon KDP will automatically use the date the book went live. So, I advise you to add it. I always add it since I want to know the day I published each book.
PRINT OPTION: This is very important because it involves the layout of your book. You will only see this option in the paperback.
In the print option, you will see the following;
Interior and paper type: KDP books can be printed in color or black and white. Black and white books can be printed on either cream or white paper. Color printing is generally more expensive than black & white. I always prefer black and white paper interior with cream paper or white paper. It is because color printing is expensive. Remember that Amazon charges for book printing.
Trim Size: Check my post on how to format the layout of a book for a clearer understanding. Trim size refers to your book’s dimensions as it will be printed. Since we used 6 x 9 inches (15.24cm x 22.86cm). It is what we will choose here. Do not choose a trim size that is different from your book layout to avoid errors when the book is printed. There are still other trim sizes. But ensure you choose the one that will fit your book.
Bleed Setting: Setting your interior to “bleed” allows printing at or off a page’s edge. It is used to support images and illustrations. Most books use “no bleed” unless there is a specific reason to apply “bleed.” Changing the bleed settings will not change the manufacturing cost. Since I don’t have many images or illustrations, I always choose no bleed. And it makes the book more unique as everything is in-line.
Paperback cover finish; KDP supports glossy as well as matte covers. I always go with the glossy option since it is far better for non-fiction books.
UPLOADING EBOOK/PAPERBACK
Click on the upload and upload your book.
For ebooks, the recommended format for Kindle eBooks is; Docx, EPUB, KPF, etc.
For paperback, KDP recommends using a formatted PDF file to create your paperback. You can also upload a DOC (.doc), DOCX (.docx), HTML (.html), or RTF (.rtf). Hebrew, Latin, and Yiddish only support PDF manuscripts.
In my books, I use doc or EPUB format for ebook and PDF format for paperback. You can use anyone you want.
After uploading, allow it some time to load. After loading, it will appear on the page as successful. If there are errors in the book, you will be notified. You can click on the notification to view the mistakes and correct them if there is a need to do so.
KINDLE/ PAPERBACK BOOK COVER
It is where most authors get frustrated. If you don’t know how to do this, you might spend hours editing and uploading the cover. I think I spent more than two hours editing and re-uploading my book cover the first time I published a book on Amazon.
I’ll have to explain the two covers separately for better understanding.
Kindle Cover
The recommended format is JPG or TIFF. If your cover is not in these two formats, go to Google, use a tool, and convert your cover to JPG.
The ideal size of your eBook cover art is a height/width ratio of 1.6:1. It means that for every 1,000 pixels in width, the image should be 1,600 pixels in height. In other to ensure the best quality for your image, particularly on high-definition devices, the image’s height should be at least 2,500 pixels. The ideal dimensions for the cover file are 2560 x 1600 pixels.
Note: The minimum image size allowed is 1,000 x 625 pixels. The maximum image size allowed is 10,000 x 10,000 pixels.
Your cover image must be less than 50MB. Try to avoid compressing your files. It can affect the quality of your cover when displayed on reading devices. Images should have a minimum resolution of 300 PPI (pixels per inch) for the best results.
If you are using Canva, there is already a book cover template. You only need to choose the book cover template and create your cover, or you can learn How to Design a Book Cover.
Once you have created your cover, click “Upload a cover you already have” and upload your cover.
However, you can still use Amazon cover creator to create your book cover. You can design your cover using your image or Amazon stock images when you click that option. It is straightforward to use as a beginner.
Paperback Cover
The recommended format is PDF. But before creating your cover, download your KDP template HERE. On the left side of the template page, input your;
- Trim size (6 x 9inches (15.24 x 22.86 cm)). That is if you are using that trim size.
- Page count; that is the total number of your book pages.
- Paper color. I usually choose cream.
Then click on the “DOWNLOAD COVER TEMPLATE.” Your cover page will be downloaded as a zip file. Inside the zip file is PDF and Doc format. You can use anyone you want to design your cover.
After downloading it, go to Canva or any other book cover creation platform. Use the custom dimension and put your height and width (6 x 9inches (15.24 x 22.86 cm)). Upload your cover template and ensure it fits into the 6 x 9 inches (you can expand your template so that it will fit in). Then design your cover. The right is your front cover, while the left is for your back cover. Leave the middle empty if your book is less than 120 pages.
After creating your cover, download it and upload it on your book cover page.
NOTE: Read the text on the template to know the areas to add images or text. Don’t allow text to come too close to the black lines. Also, don’t allow text to cover the Bar code. The bar code is where your ISBN is to be placed.
If you don’t know how to create a cover, you can use Amazon cover creator to make your paperback cover.
After uploading your cover, allow it some time to load. After loading, it will appear on the page.
KINDLE /PAPERBACK PREVIEW
Always preview your book before publishing. How your book is when you preview it is how it will look on a Kindle device or when it is printed.

Kindle Ebook Preview: click on the “Launch Previewer.” Allow it to load. It might take time, depending on how strong your network is. I always recommend that you publish your book when the network is strong so you won’t get frustrated. If your network is strong, the preview should load within 5 minutes. Once the preview loads, click on the slide icon by the right and check each page and see if they are well arranged. Also, check if the cover is positioned very well. Check all the whole pages and see if they are well organized.
If there are errors, go back and edit your book or cover, upload it again, and preview it. But if there are no issues, go back and continue with your publishing.
Paperback Book Preview: Click on launch previewer. You will be taken to the preview page. Check if the fonts are correctly embedded. Check if the cover is placed well. Change from “two-page view” to “thumbnail view” and check all the pages. If there is an error, click the “Exit print previewer,” go back, correct it, and upload again. But if there are no errors, click “Approve” and continue with your publishing. You can also download a pdf proof at the page’s top right corner.
Common problems with Book Cover Uploading
Improper trim size: If you don’t use the proper trim size, you’ll keep getting errors. So, ensure you use the cover template and select the cover template you used when creating your cover.
Read also, Up to Date Guide on How to Make a Living Writing
Bar code Issue: Don’t allow text to touch the bar code area.
Spine area: Don’t allow text to touch the spine area.
Once you are done, click save and go to the next page, which is the last page.
KINDLE / PAPERBACK PRICING
It is the last page of amazon book publishing. It is the pricing page. So, it would be best to be careful about what you choose on this page. I’m going to walk you through how to fill this page.
Below are some of the things you’ll see on the Amazon Kindle/paperback price page.

KDP Select Enrollment: It is the place where you choose to enroll in kindle select or not. Kindle Select is a free kindle program that gives authors more opportunities to reach more readers. With kindle select,
- The Author can reach more readers.
- Be eligible for 70% royalty earnings on customers from Brazil, Japan, India, and Mexico.
- Authors can add their books to Kindle unlimited. It allows authors to earn from the KDP Select global fund.
- Authors can also be able to access promotional tools like Kindle countdown deals and free book promotions.
However, to be eligible for kindle select enrollment, your must;
- Have exclusive copyright over your book (your book is not a public domain).
- Make your book available to the kindle store for the KDP select enrollment period of 90 days.
I enroll my books in Kindle select since it allows me to reach more readers.
Territories: It is the territories you want Amazon to distribute your book. You have two options, either to choose all territories or individual territories. Select the territories you hold worldwide right for your book.
If you choose worldwide right, it means that you want your book to be available in all Amazon stores. If your book is your original content, you will likely choose worldwide, right? The individual territory right is mostly for people publishing public domain content.
I always choose all territories since my books are original content.
Royalty and Pricing
Setting the right price for your book is very crucial. In this section, I’ll talk about the pricing for each version;
Ebook Pricing:

Royalty plan: There are two royalty options; the 35% royal plan and the 70% royalty plan.
In other to be eligible for the 70% royalty plan, your works must not be in a public domain, but if it is in a public domain, you will only be eligible for a 35% royalty plan. For more information, check the Amazon list price requirement.
Primary market: It is the market you wish to use to set your price. However, your price on your primary market will be converted to other markets.
List Price: It is the price you set for your ebook. Check the Amazon list price page above.
Paperback Pricing
Paperback pricing has only one royalty option, which is 60%. However, if you opt for expanded distribution, you will be eligible for a 40% royalty plan, excluding printing costs. The printing cost is deducted from your royalties and varies depending on your book’s page count and whether your book’s interior is in black and white or full color.
Expanded Distribution: It allows you to reach more readers by distributing your paperback through a bookstore, online retailers, libraries, and academic institutions.
Book Lending: This option is only available in the ebook section. You will notice that this option is locked. Why is it so? It is because you opt for a 70% royalty plan. All books that are under the 70% royalty option are enrolled to book lending by default. However, you can uncheck the option if you opt for a 35% royalty plan.
Terms and conditions: Read Amazon KDP terms and conditions and accept them. By ticking the KDP terms and conditions, you agree to comply with the KDP terms and conditions. Read the KDP terms and follow the rules before publishing your book.
After that, click on publish. Amazon will review your book and make it available in the Kindle store within 72 hours.
However, the review times might vary depending on different factors. But, if your book returns to draft mode after some time, check your email. Amazon will send you a message explaining why your book was not published. Follow the instructions and edit your book and publish it again. If you don’t see the email in your inbox, check your spam folder or wait for some hours. The message will come. Once your book is live, Amazon will notify you via email that your book is live in the kindle store.
NB: All of the above steps are subject to changes. Amazon changes its T and C from time to time. So, always read Amazon’s terms and conditions before publishing your book. All the images are from KDP.
I hope this article was helpful.
Like our Facebook Page


